Sunday, June 20, 2010

Building a PVC Lawn Sprinkler

There are about a million different lawn sprinkler heads available through the locall ironmonger (i.e., Lowe's), which seem more flexible than the plain old hose sprinklers you can buy off the shelf. Hose adapters which allow use of the sprinkler heads are available, but they are rather overpriced. So let's build our own!

Buy this stuff:

a sprinkler head of your choice (remember, there are a million of them to choose from...)

a section of 3/4" Schedule 40 PVC pipe (10 ft length)

one 3/4" Tee fitting

one 3/4" slip-and-threaded Tee fitting (Note: my Lowes and Home Depots were out of these, so I had to use another regular Tee and a 3/4" slip to threaded coupler and a short piece of pipe to connect them. This is not as good, because it makes the sprinkler head higher off the ground, and it's more work.) 

two 3/4" end caps

a 3/4" to female hose fitting (These are usually near the sprinkler heads, instead of with the pipe fittings.)

a short 3/4" sprinkler head riser (a pipe threaded on both ends)

some PVC cement

The pipe and fittings cost about $6.00, the cement was about $4.00, and the sprinkler head was $10.00. Total cost about twenty bucks, and you have enough pipe and cement to make at least two more adapters - the next adapter would cost less than $4 plus the head. (The store-bought adapters are about $25 without a head.)

Now, let's get to work.

Cut the pipe into several pieces. You can make the ends nice and square if you use a miter box. (I found out that my table saw works great for cutting plastic pipe.)
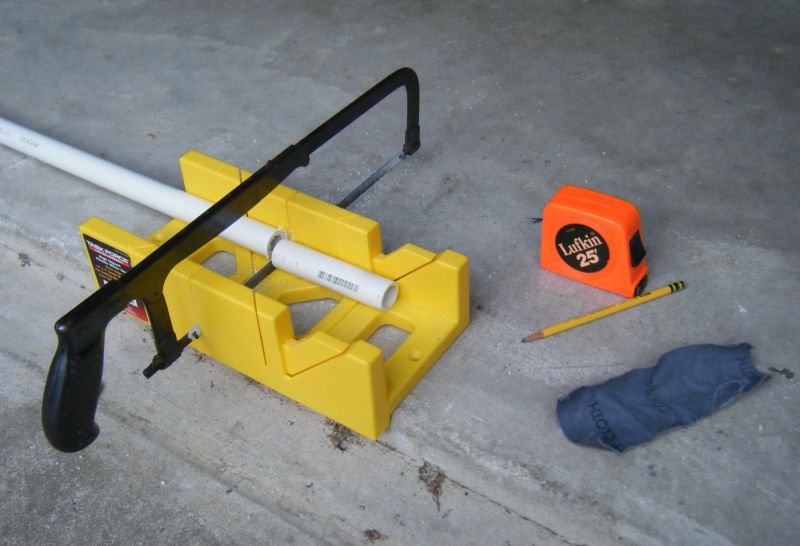
The pieces shown are

1 ea 2 inches long

1 ea 4 1/2 inches long

2 ea 8 inches long

1 ea 10 inches long

(I think it would look better if the last piece was 8 inches instead of 10, so next time I will use three 8 inch pieces. Besides, 2 - 4 - 8 is a nice geometrical progression!)

After the pieces are cut, use some course emery cloth to remove the burrs, smooth the corners and rough up the ends of the pipe pieces and insides of the fittings. That makes the glue work better.

Now we start gluing pieces together. The instructions on the cement can are quite good. I made up these sub-assemblies so that I didn't get too many parts glued together wrong, and to make final assembly easier. (The piece on the lower right would not have needed the short pipe and adapter that points downward in the photo if I could have found the slip-thread Tee.)

The last, and only critical step, is gluing the upright part to the horizontal part so that it is vertical. Otherwise, your sprinkling pattern would be asymmetrical. (On the other hand, if you are going to be sprinkling on a hillside, you might WANT to make it crooked.)

See - it looks pretty plumb.

And here is the final product. (We use quick-connect hose couplings for convenience.)


That's a gear-driven pop-up rotary head. Now I have to go read the instruction book on how to adjust it.

Thursday, April 22, 2010

First Hover - HK450

After finishing the assembly, doing the heli setup as best I could figure out, programming the transmitter for beginner mode and installing the training gear, I finally got up the nerve to try hovering.

The best advice is: Don't do it yourself - get an experienced pilot to check your setup and do the initial flight. Oh well...


Contrary to appearances, it did not crash off screen (as in Flight of the Phoenix...). It stopped safely, just short of the bushes.

Needless to say, I was happy - and relieved.

Tuesday, April 13, 2010

R/C Helicopter

My new helicopter kit finally arrived from China. My order took about a month to arrive, because a couple of items were backordered, and I made a couple of changes to the order. Once it shipped from the HobbyKing warehouse in Hong Kong, it got here in a week. It is a HobbyKing HK-450 electric heli. The rotor diameter is 28 inches.

These are the components, right out of the box. The main frame, rotor head and tail rotor were assembled at the factory.
Here it is pretty much assembled. A few parts are still needed (motor pinion gear, longer servo links), and the electronics and wiring have to be secured. After I set it up as good as I know how, I will take it to a local expert for a checkout and initial hover.
In the meantime, I am practicing on the simulator...

Monday, January 25, 2010

Helicopter Landing Gear Repair

Due to a hard landing on a hard floor, the RH landing gear broke.
These are the pieces. I had already tried a repair; the built up protrusion on the straight stalk is adhesive.
I used ABS cement.
The adhesive made a nice fillet at the joint. The strength of the repair is to be determined.

Thursday, December 17, 2009

FirstGear TPG Ranier Motorcycle Jacket

Now that winter is actually settling in, I am really enjoying my new FirstGear TPG Ranier jacket. Apparently, this is an outgoing model because they are on sale at both Cycle Gear ($180) and NewEnough.com ($149) – MSRP was $400!


This jacket is stout – it weighs almost 6 pounds with the liner and armor in. The outside layer is heavy nylon, with Kevlar reinforcing at the shoulders and elbows. The nylon full-sleeve liner is removable, and can actually serve as a separate windbreaker. The front closure is a stout two-way zipper (so you can unzip the bottom parially for more freedom of movement) plus a snapped storm flap with rain gutter. It keeps the wind out quite well.

There are plenty of pockets, including four waterproof ones on the front: two large ones with inner and outer compartments below, a smaller one above on one side and a cell phone pocket on the other side. The cell phone pocket includes a clever strap with which you can lift your phone out without having to dig down into the narrow pocket. There are other pockets on the arms, inside the liner, inside the outer shell and a large pouch on the back. The front left inner pocket even has a grommeted opening in the inside at the bottom so you can route your MP3 player headphone cord with the zipper fully closed.

The fit is adjustable, with zippered gussets at the waist and cuffs The cuffs also have a velcro strap for additional trimming. This makes it easy to fit the sleeves inside your glove gauntlets. There are two waist adjustment straps and a stretch cord adjuster around the bottom edge. The jacket fits my fairly narrow build very nicely, with a couple of layers of shirts and sweaters under it.

The neck is covered with a comfortable fleece lining, and has a small flap that protects your neck from the zipper. There is a velcro closure on the neck band. A very nice touch is a nylon rain hood that fits under your helmet and stores into the collar when not needed. This should do a good job of keeping water from dripping down your neck.

Knox CE-approved armor (good stuff) is included at the elbows and shoulders. There is a thin foam back pad, which can be replaced with a more substantial one (not included). There are strips of reflective material on the back, arms and front of the shoulders.

While I have not yet tested this jacket in a full monsoon, I can verify that it is truly waterproof while riding in a moderate rain, for about 45 minutes. In addition, I find that my cold-natured body stays comfortable down to freezing temperature, with the afore-mentioned extra layers under the jacket. (My fingers, on the other hand, are another matter...!) {Pun intended :}

There are large zippered vents on the front and rear of the shoulders, which should help with ventilation in warmer temperatures. Nonethless, I don’t see this as a warm-weather jacket, because it is so substantial.

If the cold days are causing you to miss some riding, I recommend this jacket as a good cure.

Tuesday, December 15, 2009

TomTom XL330S Disassembly

I don't recommend for anyone to do this.

I decided to disassemble my XL330S, because I want to add an eyebolt to the case so I can tether it to my motorcycle.

I used a knife to pry the bottom edge of the gray plastic case downward, which allowed the silver bezel lower edge to be popped up a little. This frees the tabs on the bottom of the bezel.
Then the bezel can be slid downward, to release the tabs on the sides and top.
I removed 4 phillips head screws.
Then I popped up the metal frame that holds the display assembly (it appears also to be part of the antenna). The grey rubber bushing stays behind on the display. It clips under two plastic tabs at the top.
Once the metal frame was out, I worked the display out.
The display is connected to the main board with a flexible conductor strip. The connector on the main board is latched by the light gray bracket. Here, it is in locked position, against the black connector body.
Here, the light gray locking bar has been slid away from the connector body (which looks almost gold in this photo, because of the reflection.) I used a small flat blade screwdriver to work each end loose.
The conductor strip is stuck down with double-sided tape. I was able to pull it up without kinking it too badly. Once the conductor strip is loose, it slides right out of the connector.
I removed three phillips head screws which were in the holes that look like donuts. Two on top, one near the bottom.
I popped the main board out, starting at the bottom. There is a locating pin near the USB connector that needed to be worked loose. Then I pulled the speaker and battery cables from their connectors on the main board.
There's the battery - it appears to be glued quite firmly in place.
Here's the front of the main board.
Here's the back of the main board.

So, here's the screw to hold the external clip I added. I used an 8-32 panhead stainless steel machine screw.And here's the external clip. I used a stainless lock nut and a washer on each side.
It's all back together... and it still works!